Deploying your Node.js application to production using AWS with Custom Domain & SSL

Table of Contents
Note: Even though this article was written in the context of Node.js/MERN apps. If you are looking to deploy your non-Node.js apps to AWS, you can still refer to sections of this article for NGINX, custom domain, SSL setup, etc.
Introduction⌗
In this article, I would like to outline the configuration of a production environment and deploying a Node.js/MERN application onto AWS, served using an SSL enabled custom domain.
Recently, I deployed multiple apps onto AWS, I was slightly overwhelmed as I was referring to multiple sources of information to get things up and running. I felt the need for a one-stop in-depth guide to help understand the process. It struck me then to write a detailed article and some reference cheatsheets for the same.
I will only be covering the deployment section in this article, I will update or add another post later regarding further optimizations after the entire deployment process.
Buckle up. This is gonna be a long and detailed article.

Project Structure⌗
For this article, I’m going to reference my MERN SPA application called Shrynk.js.
Live: https://shrynk.jagankaartik.live
This is just a transient folder structure of the application. This is a monorepo, which means that there is a separate React client folder and an Express server folder.
.
├── Makefile
├── app
└── server
| What I’ve used for deployment ? | |
|---|---|
| Cloud Service Provider | AWS EC2 |
| Managed DNS | AWS Route53 |
| AMI Instance Type | Ubuntu 20.04 LTS |
| Source Code Management | Github |
| Reverse Proxy | NGINX |
| Process Manager | PM2 for Node.js |
| Custom Domain Provider | Name.com |
Steps⌗
1. Creating a Ubuntu Linux Instance using AWS EC2⌗
2. Install Node/NPM⌗
3. Clone your project from Github/Gitlab/Bitbucket⌗
4. Install all the dependencies⌗
5. Setting up PM2 Process Manager⌗
6. Setting up NGINX⌗
7. Setting up Custom Domain for our EC2 Instance⌗
- Setting up and managing DNS for a Custom Domain using domain name provider’s basic DNS
- Setting up a Hosted zone and Managing DNS for a Custom Domain using AWS Route53
8. Adding SSL with LetsEncrypt⌗
Creating a Ubuntu Linux Instance using AWS EC2⌗
Fairly straight forward, if you don’t have an AWS account. Create a free-tier account and continue.
Budgeting⌗
This is a critical step, particularly if you are not using a free tier account. Always set a budget and threshold for billing alerts to prevent unexpected invoices, etc. Even if you are on a free-tier account, set a budget.
Set budgets and remember prevention is better than cure.
Region selection⌗
By default
Amazon EC2 is hosted in multiple locations worldwide. These locations are composed of Regions, Availability Zones, Local Zones, AWS Outposts, and Wavelength Zones. Each Region is a separate geographic area.
The default region is US East (Ohio) (us-east-2)
Change your default region depending on your application’s use case. This is the location of the data center where our Linux instance resides.
If you have a small app, that you built as a hobby project. Choose the AWS Region that is closest to your location geographically. Choose Asia Pacific (Mumbai) if you are in South India, Asia Pacific (Sydney) if you are in Australia, and so on.
When developing an application that must serve users from a specific geographical area with almost no latency, we must make the appropriate choices (Region Selection, CDNs, etc). However, this is beyond the scope of this blog.
Creation of Instance⌗
On the EC2 Dashboard, select the Launch Instance option.

Choose Amazon Machine Image (AMI)
Choose the Amazon Machine Image, for this build we choose Ubuntu 20.04 LTS for 64bit (x86) arch.

Choose the Instance Type
Amazon EC2 provides a wide choice of instance types optimized to fit distinctive use cases. Instance types comprise varying combinations of CPU, memory, storage, and networking capacity.
Here t2.micro qualifies for free-tier, also this should be sufficient for small web apps.

Instance Configuration
Leave the defaults alone; this section essentially asks for the number of instances (for scaling up the application), custom virtual private cloud (VPC) settings, IAM roles, and so on.

Storage
The defaults should suffice.

Security Groups
Add rules to allow traffic from HTTP and HTTPS.

Reviewing the Instance
In this step, we can see our AMI, instance type, security groups, storage and other info. Hit Launch to create the instance.

Upon Launch, we have to create a key-pair which is to be used as a private key for SSHing into our created instance. Create and store this key-pair safely.
A GIF walkthrough of the creation process
Connecting to the Instance⌗
Go to EC2 > Instances > Instance-ID > Connect to Instance -> SSH Client
chmod 400 - To protect a file against accidental overwriting.
chmod 400 "your-key.pem"

ssh -i /path/my-key-pair.pem my-instance-user-name@my-instance-public-dns-name

# Example
ssh -i "you-key.pem" ubuntu@ec2-xx-xx-xxx-xx.region.compute.amazonaws.com
Install Node/NPM⌗
After SSHing to Instance, first lets install Node.js.
If you want the latest version Node v16.x use the below script, other versions of Node are generally in the form of setup_v.x here v16.x so setup_16.x.
curl -fsSL https://deb.nodesource.com/setup_16.x | sudo -E bash -
sudo apt-get install -y nodejs
node --version
Check out the NodeSource link for detailed installation instructions on other platforms/versions.
Link to NodeSource for Node.js Binary Distributions: https://github.com/nodesource/distributions/blob/master/README.md
Clone your project from Github/Bitbucket/Gitlab⌗
First, connect your account via SSH and clone your repository. Find below the links for connecting SSH via Github/Gitlab/Bitbucket
Links for connecting SSH via Github/Gitlab/Bitbucket
Once SSH keys are generated and added to your Github/Bitbucket/Gitlab accounts. The next step is to clone your repositories to your instance.
Install all the associated Dependencies⌗
Go to your folder containing package.json and run,
# If using yarn, install yarn too.
# npm i -g yarn
yarn install

# Tests if any
yarn test
Makefile (simple hack…)
In my application, I have created a simple Makefile where I’ve specified the nessessary installation and build commands. Running make install will install all the required dependencies and make build will build the application.
Contents of the makefile.
install:
		cd app && yarn install
		cd server && yarn install

build:
		cd app && yarn build
		cd server && yarn build
A makefile is ideal in this scenario, as it automates a part of the installation process rather than going manually to the folder and running the commands. Also being a monorepo containing package.json file in both client and server, this is a better approach.
# To install all dependencies, go to root directory (Makefile present in root)
make install

# To build the React App & Typescript Express App
make build
Setup PM2 Process Manager for Node⌗
Why PM2 ?⌗
PM2 is a production process manager for Node.js applications with a built-in load balancer. It allows you to keep applications alive forever, to reload them without downtime and to facilitate common system admin tasks. - https://pm2.keymetrics.io/
Usually on dev or local environments, a node application runs actively on terminal, only quits if we manually hit cmd+c or ctrl+c. Running your application on production normally using commands like yarn dist/index or npm run start would definitely work. However, if you’ve noticed sometimes when things so wrong (errors) the application abruptly stops. If this happens in production, it’s gonna cause a lot of chaos.

Simple Context :)
My application is a URL-shortening service. Let’s picture this scenario with some scale. If the service goes down, users will be unable to create and redirect URLs. Which is not at all optimal if you operate for a huge scale of users.
In real-world scenarios, this leads to a lot of chaos, as our “service” may be a part of any other critical services. Eg. Authentication Provider, SAAS platform, etc.
> Note: Just an easy-to-understand example quoted above, how it happens in
 real-life scenarios is far more complex. (again out of scope)
To solve such issues, we use PM2 as it runs a node application in the background. It provides features like monitoring, load-balancing, keep various versions up to and running, watch and reload, etc.
Refer: https://pm2.keymetrics.io/
Install PM2 using NPM or Yarn
sudo npm i pm2 -g
# or
sudo yarn add global pm2
Go to your app's entry file
pm2 start app.js # (or whatever your file name)
PM2 Commands for Reference⌗
Shows detailed metrics about Memory, Process Info, Uptime, Log paths etc
pm2 show app
Shows the application status (online,stopped) with a overview of CPU & Ram usage
pm2 status
Restarts the app
pm2 restart app
Stops the app
pm2 stop app
Show Logs
pm2 logs
FLushes all logs
pm2 flush
To make sure app starts when reboot
pm2 startup
If you have a script called “start” in package.json that runs your application in production mode. Example node dist/index instead of nodemon. You can use the below command to use your npm/yarn start script via PM2.
# For running your npm.yarn start script in package.json
pm2 start yarn -- start
pm2 start npm -- start

# With name parameter to identify your application
pm2 start yarn --name "app name" -- start
pm2 start npm --name "app name" -- start
Warning ⚠️ - We are going to alter Security Groups to add the corresponding PORT X of your application (for just verification purposes). After this, we need to remove PORT X from security groups.
Go to your EC2 Instance Summary, In the security tab, you will find the “security group” associated with your EC2 Instance.

Clicking that link, now you will be presented with the Security Groups Dashboard.
Now, click edit Inbound Rules and add Custom TCP & Specify PORT from Anywhere

Now, it should look something similar to this, based on your PORT.

Now, you will be able to access your site at EC2 Instance's Public IP Address:PORT eg: 231.112.123.12:8000
In the above step, we accessed our main application via PORT:8000. In a production environment, we need to avoid this by listening only at 80 or 443.
- NGINX should be set up as a reverse proxy to proxy client requests from 80 or 443 to 8000 on the instance.
- Security groups should be set up to only allow access via 80,443 blocking all other ports.
Warning ⚠️ - Only remove your Custom TCP & PORT, do not remove any other types of rules.
Now, remove the above added Custom TCP & PORT from inbound rules.
Setting up NGINX⌗
Based on the assumption that we are using this EC2 instance just for one particular Node.js/MERN app and not having multiple different Node.js/MERN apps.
We will be editing the “default config” if you want to deploy multiple apps on a single instance. I will follow up with a post and update a link to it.
Nginx is a high-performance web server and a reverse proxy server.
A web server is a software that serves web content through the HTTP protocol. Content can be static or dynamic.
A reverse proxy is a service that takes a client request, sends the request to one or more proxied servers, fetches the response, and delivers the server’s response to the client.
- Load Balancing
- Backend Routing
- Caching
Installation⌗
sudo apt install nginx
After installation go to Port 80 of your EC2 Instance’s public IP, which is basically just your IP address without PORT. If you see the NGINX welcome page, NGINX is successfully installed.
Now, we need to change the default configuration.
cd /etc/nginx/sites-available/default

sudo vim default
This is a starting section of the syntax-highlighted NGINX default config,
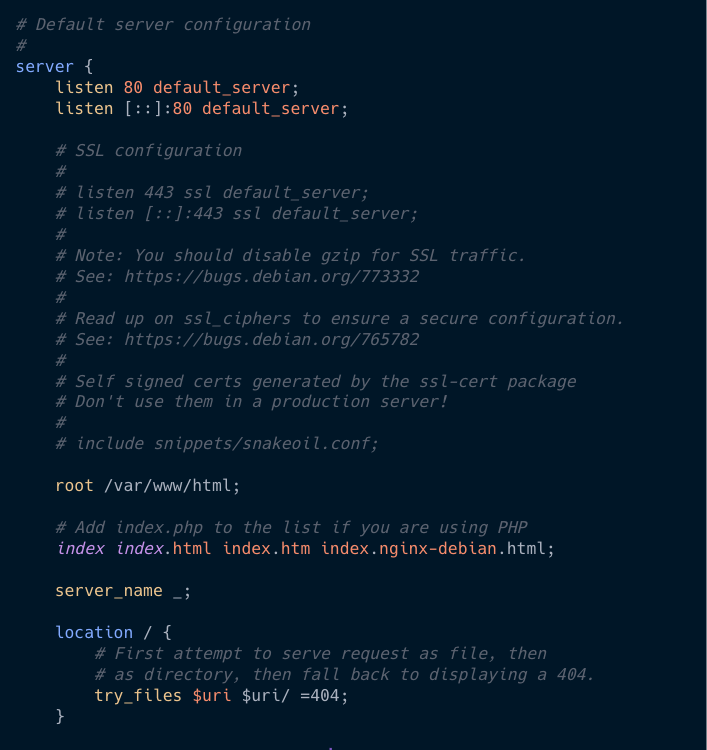
We need to modify the below section,
server_name _;
location / {
  # First attempt to serve request as file, then
  # as directory, then fall back to displaying a 404.
  try_files $uri $uri/ =404;
 }
Add the following snippet replacing the section in the default config.
  server_name yourdomain.com www.yourdomain.com;

  location / {
        proxy_pass http://localhost:8000; # App's port
        proxy_http_version 1.1;
        proxy_set_header Upgrade $http_upgrade;
        proxy_set_header Connection 'upgrade';
        proxy_set_header Host $host;
        proxy_cache_bypass $http_upgrade;
    }
Explanation of the above Code Snippet⌗
In the default NGINX configuration, nginx listens on port 80 as indicated by the line listen 80 of the server block.
-
proxy_passforwards all requests to the given proxy url. Here the proxy url ishttp://localhost:8000. -
proxy_http_versionsets the HTTP protocol for proxying. By default, version 1.0 is used. For Websockets and keepalive connections you need to use the version1.1. -
proxy_set_header Upgrade $http_upgradeandproxy_set_header Connection 'upgrade'header fields are required to switch the connection to an enhanced protocol if available. -
proxy_set_header Host $hostis used to set the host to$proxy_host. -
proxy_cache_bypass $http_upgradewe include this directive to not send cached responses to clients.
Refer link for more detailed info: http://nginx.org/en/docs/http/ngx_http_proxy_module.html
After adding the above code snippet, check NGINX config for errors and restart nginx.
# Run this to check NGINX config
sudo nginx -t
Output

nginx: the configuration file /etc/nginx/nginx.conf syntax is ok
nginx: configuration file /etc/nginx/nginx.conf test is successful
Restart NGINX service
sudo service nginx restart
Now to check NGINX status,
sudo systemctl status nginx
If you get this output then success!

● nginx.service - A high performance web server and a reverse proxy server
Loaded: loaded (/lib/systemd/system/nginx.service; enabled; vendor preset: enabled)
Active: active (running) since DAY YYYY-MM-DD HH:M:SS UTC; X days ago
Docs: man:nginx(8)
Main PID: xxxx (nginx)
Tasks: 2 (limit: 1160)
Memory: X M
CGroup: /system.slice/nginx.service
├─ xxxx nginx: master process /usr/sbin/nginx -g daemon on; master_process on;
└─xxxx nginx: worker process
Now, You will be able to view your app on Instance’s Public IP with no port (port 80) EC2 Instance’s Public IP Address eg: 231.112.123.12
Setting up Custom Domain for our EC2 Instance⌗
Based on the assumption that you have a custom domain. I will give an overview of using both the Basic & Route53 DNS.
Why Basic DNS?⌗
In the context of small-scale web apps, hobby projects that you want to showcase using your custom domain. Ideally use the free DNS service that is provided with your custom domain name providers, such as Namecheap or Name.com
Why Route53 DNS?⌗
In the context of large apps, that you want to geographically scale :) pay extra for a “premium” DNS provider to get better lookup speeds (the time it takes to redirect a user) and faster propagation times (how long it takes for changes to your DNS configuration to take effect). Eg. Route53, Cloudflare, etc. Route53 is an advanced managed DNS provided by AWS, it integrates well with AWS’s services. There are tons of features for Route53, it acts as a load balancer at the DNS level, can be used for advanced A/B testing, integrates with ELB, etc. Detailed use cases, comparisons of Route53 are far out of the scope of this blog.
Setting up and managing DNS for a Custom Domain using domain name provider’s basic DNS⌗
All you have to do is create two A records in the DNS records section. An A record points a hostname to an IP address.


That’s it process complete, depending on your provider. It might take some time for the actual DNS propagation.
You can use nslookup or dig to check dns response. Sample nslookup output given below.
nslookup yourdomain.com

# Output
Server:		192.168.0.1
Address:	192.168.0.1#53

Non-authoritative answer:
Name:	yourdomain.com
Address: xx.xx.xx.xx # AWS EC2 Public IP
If the Non-authoritative answer’s address points to EC2’s Public IP. Boom!
After this step, your app will be accessible via http://yourdomain.com
Skip to the last section for SSL configuration.
Setting up a Hosted zone and Managing DNS for a Custom Domain using Route53⌗
Now we need to set up a Custom Domain to point to our instance and complete the SSL setup.
Steps⌗
- Create a Hosted Zone for your domain.
- Create two A records for your domain.
- Add your Hosted Zone’s AWS Nameservers to your custom domain provider’s nameserver section.
Hosted Zone⌗
A hosted zone is a container for records, and records contain information about how you want to route traffic for a specific domain, such as example.com, and its subdomains (acme.example.com, zenith.example.com) - AWS Docs
Note: Hosted Zone doesn’t come under a free-tier, hosted zone is paid.
It costs about,
- $0.50 per hosted zone / month for the first 25 hosted zones
- $0.10 per hosted zone / month for additional hosted zones
Queries costs about,
- $0.40 per million queries – first 1 Billion queries / month
- $0.20 per million queries – over 1 Billion queries / month
Refer: https://aws.amazon.com/route53/pricing/
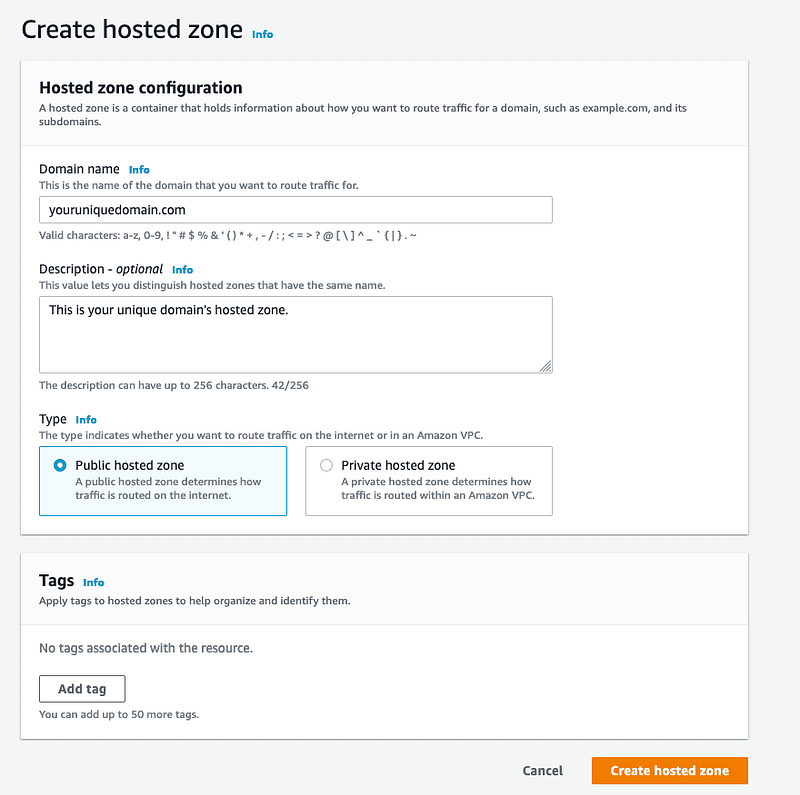
Create a hosted zone
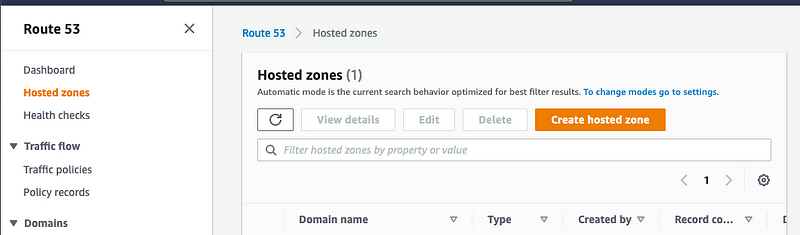
Add your domain, description, type (public here) and hit Create hosted zone
- Public hosted zones contain records that specify how you want to route traffic on the internet.
- Private hosted zones contain records that specify how you want to route traffic in an Amazon VPC.
Refer for more info: https://docs.aws.amazon.com/Route53/latest/DeveloperGuide/hosted-zones-working-with.html
Since we are building an application that needs to be accessible from the web, select Public Hosted Zone
In the Hosted Zone dashboard, we can see the Record, Type, Value/Route traffic to options.
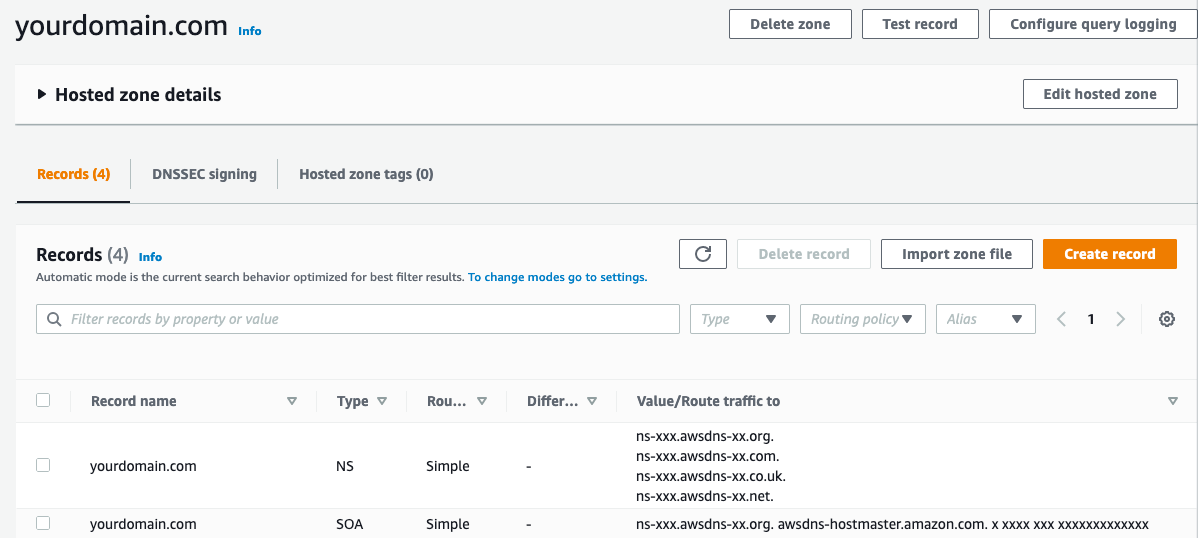
We need to create two A records, to route all traffic hitting yourdomain.com and www.yourdomain.com to the public ip of the created EC2 Instance.
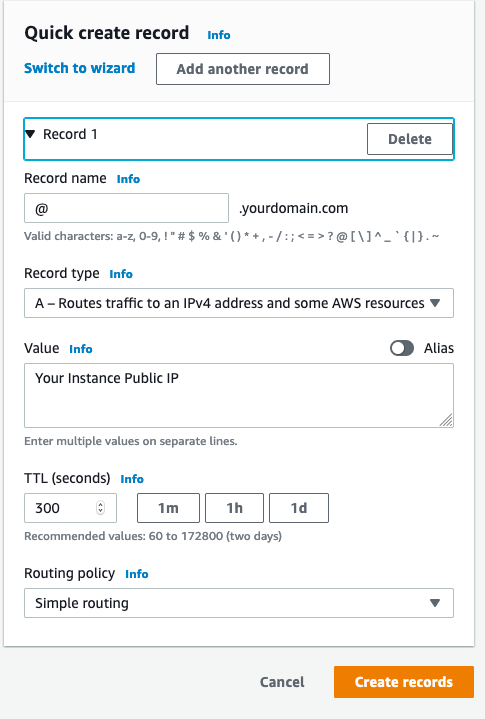
Creating @ record
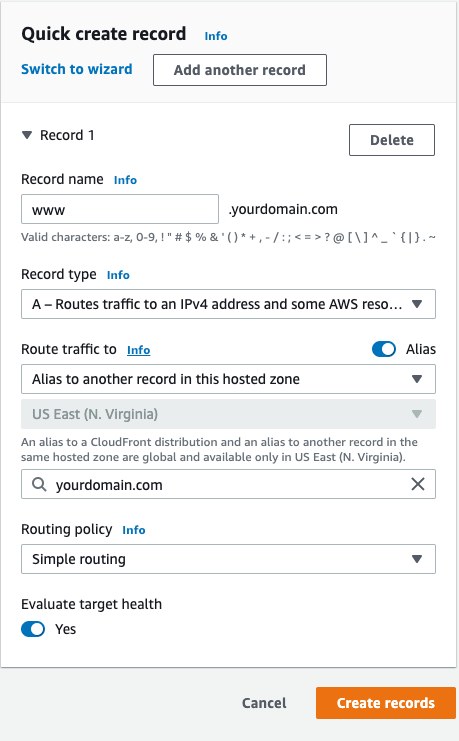
Creating WWW record
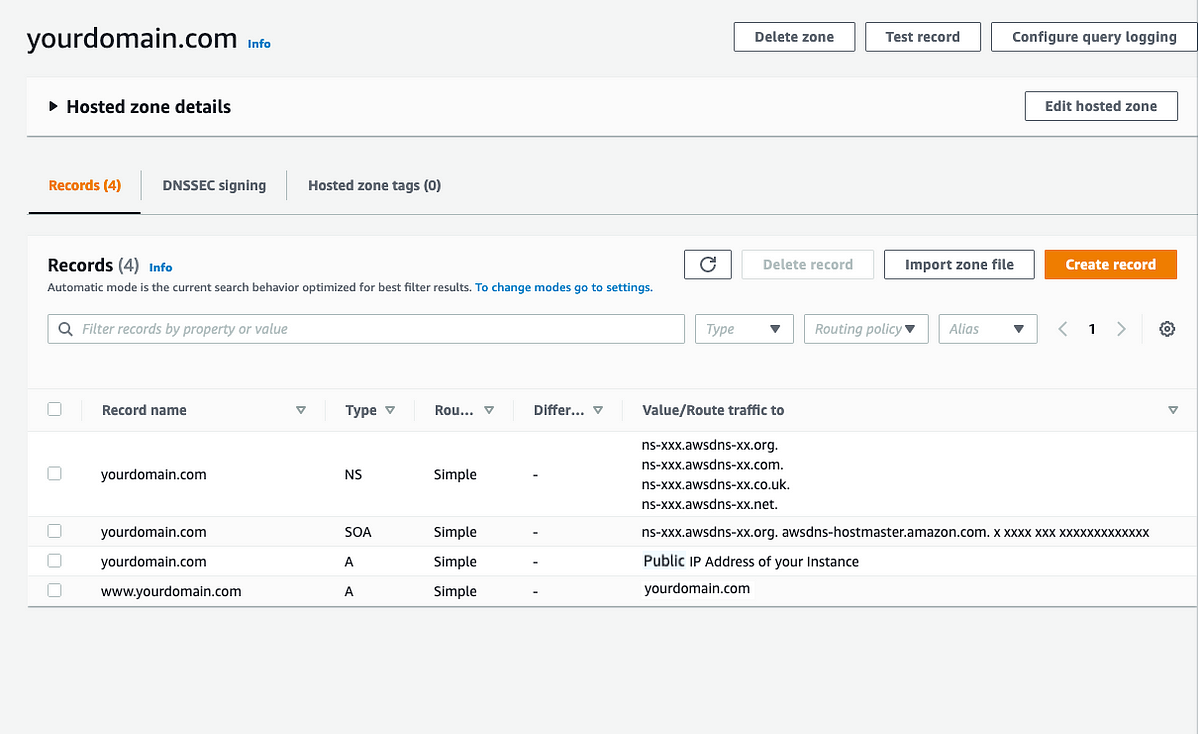
Now, the hosted zone dashboard should look like this.
Updating Name Server Records (NS)⌗
We need to add the NS Record values to our custom domain provider’s nameserver section.
Find the name server records associated with your domain.
ns-xxx.awsdns-xx.orgns-xxx.awsdns-xx.comns-xxx.awsdns-xx.co.ukns-xxx.awsdns-xx.net
Add them to your domain name provider’s Nameserver section.
Please Note
Nameservers are the first thing domain names look to when they need to know where the content of a site is located. Nameservers dictate the DNS, which means you have to set up the DNS records with your nameserver provider.
If you have no other major DNS records. (skip below Warning)
NOTE: If you have existing DNS records managed by your custom domain provider, if you update the given Nameserver records to AWS’s Nameserver records, your other existing DNS (A, CNAME, etc) records will not work. You will have to update them on Route53’s hosted zone dashboard in order for them to work, also this can cause some disruption the first time as DNS progression takes time.
If you are on a brand new domain or a domain without other DNS records, then no need to worry. Proceed
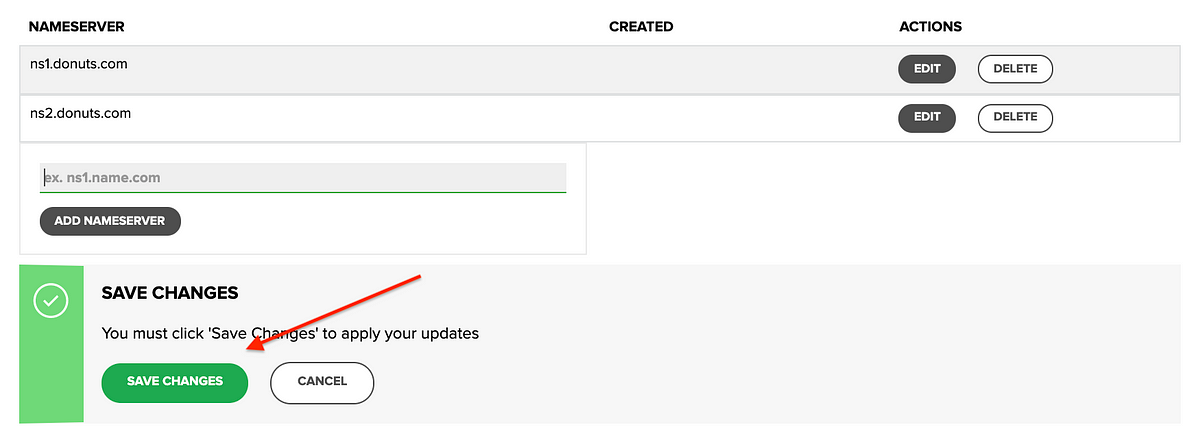
Name.com⌗
- You will need to remove all nsx.name.com records and add the above aws nsrecords associated with your domain.
Refer: https://www.name.com/support/articles/205934547-Changing-nameservers-for-DNS-management
Namecheap⌗

Similarly, add the nameservers to your domain name provider’s nameserver section.
Now, nameserver & DNS progression will take some time. You might have to wait up to 24 or above hours depending on your provider.
Mostly it happens in 1 hour or so, do check every hour. You can use nslookup or dig to check dns response. Sample nslookup and dig output given below.
nslookup yourdomain.com

# Output
Server:		192.168.0.1
Address:	192.168.0.1#53

Non-authoritative answer:
Name:	yourdomain.com
Address: xx.xx.xx.xx # AWS EC2 Public IP

dig yourdomain.com

# Output
; <<>> DiG 9.10.6 <<>> yourdomain.com
;; global options: +cmd
;; Got answer:
;; ->>HEADER<<- opcode: QUERY, status: NOERROR, id: xxxxx
;; flags: qr rd ra; QUERY: 1, ANSWER: 1, AUTHORITY: 0, ADDITIONAL: 1
;; OPT PSEUDOSECTION:
; EDNS: version: 0, flags:; udp: 512
;; QUESTION SECTION:
;yourdomain.com. IN A
;; ANSWER SECTION:
yourdomain.com. 3600 IN A xx.xx.xx.xx # AWS EC2 Public IP
;; Query time: 75 msec
;; SERVER: 192.168.0.1#53(192.168.0.1)
;; WHEN: Fri Jun 11 23:29:12 IST 2021
;; MSG SIZE  rcvd: 69
After this step, your app will be accessible via http://yourdomain.com
Add SSL with LetsEncrypt for HTTPs⌗
SSL, or Secure Sockets Layer, is an encryption based Internet security protocol. A website that implements SSL/TLS has “HTTPS” in its URL instead of “HTTP.”
sudo add-apt-repository ppa:certbot/certbot
sudo apt-get update
sudo apt-get install python3-certbot-nginx
sudo certbot --nginx -d yourdomain.com -d www.yourdomain.com
Now while certbot configures your HTTPS settings, you will be prompted to enter your email address and agree to the Let’s Encrypt terms of service.
Once the process is over, you will be again prompted to select the Redirect/No-Redirect option, select the “Redirect” option. This will ensure all “HTTP” traffic to re-directed to “HTTPS”.
You will see the,
Congratulations! You have successfully enabled https://yourdomain.com and https://www.yourdomain.com
Now,
# Check NGINX Configuration
sudo nginx -t
# Restart NGINX
sudo systemctl reload nginx
# Certificate is only valid for 90 days. Test the renewal process with
certbot renew --dry-run
Now visit https://yourdomain.com to access your MERN app with HTTPs.
Congratulations!

Pic Credits: Photo by SpaceX